 Last updated: February 26th, 2020 10:54 AM
GST Refund – Exports of Services
As per the provisions included under IGST law, the exports of services are considered as zero-rated supply is exempted from GST and are eligible to claim the refund of GST paid. The GST portal has been set up for making GST refund claims efficiently. In this article, we look at the process for claiming GST refund on exports of services.Exports of Services
As per IGST Act Section 2(6), the tax paid on export of services is refundable under the following situations are explained below:- The supplier of the service is within India.
- The recipient of service is outside India.
- The area of supply of service is outside India.
- The payment for such service obtained by the supplier is the convertible foreign exchange.
- The supplier of service and the recipient of service are not from the establishments of a different person.
Eligibility Criteria
The following conditions are eligible to file the refund application in form GST RFD-01A to claim the refund on account of exports of services with payment of tax.- The Taxpayer is enrolled with GST Portal and holds an active GSTIN (Identification Number) for the period of refund is applied.
- Form GSTR-1 and Form GSTR-3B need to be filed for all the tax periods for which refund is intended to be claimed.
- The taxpayer has to make payment for taxes at the time of exporting services, which needs to be claimed for refund.
Documents Required
The applicant has to upload the required documents along with Form RFD-01A, as notified under CGST Rules or Circulars stated. Additionally, Statement 2 having details of invoices for export of services with an integrated tax or any other supporting documentation can be uploaded by the taxpayer, if needed by the sanctioning authority.Procedure to Claim a Refund on Exports of Services
To claim for refund on the exports of services with payment of tax, follow the steps mentioned below: Step 1: Kindly visit the official portal of GST department.Provide Login Details
Step 2: Log in to the GST Portal with accurate details like username and password and click on the “Login” button. Step 3: Click the Services and select “Application for refund” option from Refund menu. [caption id="attachment_65361" align="aligncenter" width="771"] GST-Refund-Exports-of-Services--Login-Details
Select Refund Type
Step 4: Select the Exports of services with payment of tax option from the refund type. [caption id="attachment_65362" align="aligncenter" width="675"] GST-Refund-Exports-of-Services--Refund-Type
Step 5: Choose the Financial Year and Tax Period for which application has to be filed from the drop-down list and click the Create button.
Step 6: Select “Yes or No” option for a refund made for all previous tax periods starting from registration date.
[caption id="attachment_65376" align="aligncenter" width="397"]
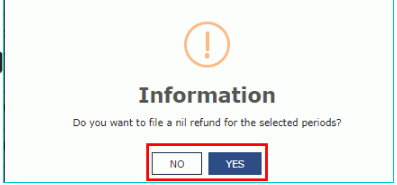 GST-Refund-Exports-of-Services-Refund-Option
In the case of Yes
Step 7: Select the Declaration checkbox and choose the name of authorised signatory in the Name of Authorized Signatory drop-down list. Step 8: Click the “File with DSC” or “File with EVC” button. [caption id="attachment_65378" align="aligncenter" width="566"] GST-Refund-Exports-of-Services-Declaration
Filing with DSC
- Click the Proceed button and select the certificate and click the SIGN button.
Filing with EVC
- Enter the OTP which is received to the email ID and mobile number of the Authorized Signatory and press the Verify button.
In case of No
Step 9: The GST RFD-01 A - Exports of services with payment of tax page is displayed. Note: To download the offline utility, upload invoice details of export of services with Integrated Tax and then file Refund on account of export of services with payment of tax.Download Offline Utility
Step 9: Click the “Download Offline Utility” link and press the “Proceed” button to continue. [caption id="attachment_65380" align="aligncenter" width="782"] GST-Refund-Exports-of-Services-Download-Offline-Utility
Step 10: Now open the excel sheet and enter the GSTIN and From and To Return Period in the prescribed format.
Step 11: Enter the GSTIN of recipient and details of invoices and tax paid and click the “Validate & Calculate” button.
[caption id="attachment_65381" align="aligncenter" width="720"]
 GST-Refund-Exports-of-Services-Invoice-Details
Step 12: The total number of records in the sheet is displayed. Click the “Ok” button.
Step 13: Click the “Create File To Upload” button and save the file.
[caption id="attachment_65388" align="aligncenter" width="774"]
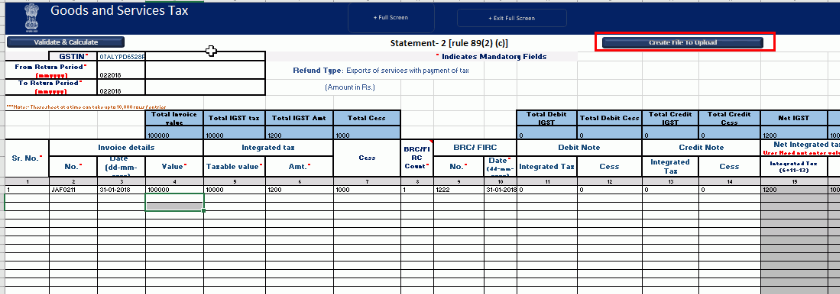 GST-Refund-Exports-of-Services-Upload-File
Upload details of the invoice of export of services with Integrated Tax
Step 14: Click the tab Click to fill the details of export of services with payment of tax. Step 15: Now, Press the “Click here to upload” button. [caption id="attachment_65393" align="aligncenter" width="770"] GST-Refund-Exports-of-Services-Upload-Details
Step 16: Now save the refund statement file and click the “Open” button.
Step 17: Click the “Download Unique Invoices” tab to view the invoices that have been uploaded successfully and click Validate statement button.
[caption id="attachment_65398" align="aligncenter" width="766"]
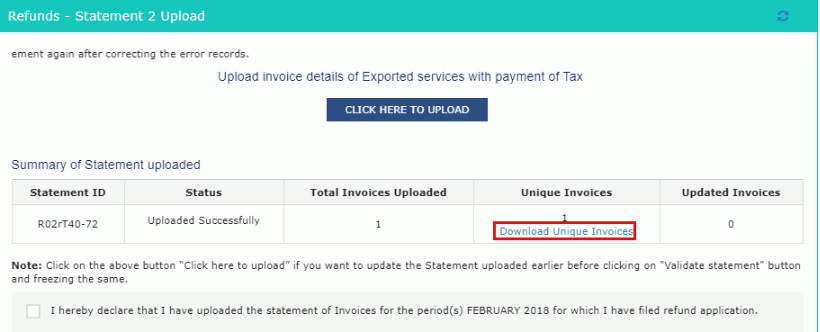 GST-Refund-Exports-of-Services-Download-Invoices
Step 18: Upon statement validation, a confirmation message on the screen that the statement has been submitted successfully for validation. Click the “Back” button.
Refund of Exports of services with tax payment
Step 18: Enter the value in statement-2 below for the tax period for which the refund to be claimed. Step 19: Click the hyperlink Click to view Electronic Liability Ledger to see details of Electronic Liability Ledger that displays liabilities/ dues of Returns and other than Returns and press the Go back to refund form to return to the refund application page. [caption id="attachment_65402" align="aligncenter" width="765"]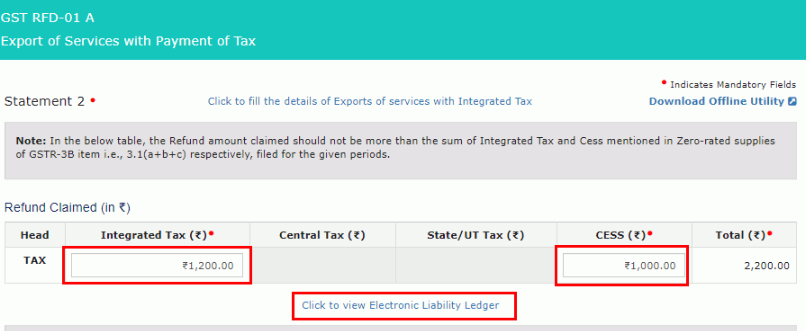 GST-Refund-Exports-of-Services-Refund-Export
Step 20: Select the Bank Account Number from the drop-down list, and upload supporting documents and click the “Submit” button.
Step 21: After the statement successfully submitted a message is displayed for confirmation and click on the “Proceed” button.
Step 22: Select the name of authorised signatory in the name of the authorised signatory drop-down list. Choose the File with DSC or File with EVC button.
File With DSC- Method
- Click the “Proceed” button and select the certificate and click the “Sign.”
File With EVC – Method
- Enter the OTP sent on email and mobile number of the Authorized Signatory registered at the GST Portal and click the Verify button.
Popular Post

In the digital age, the convenience of accessing important documents online has become a necessity...

The Atalji Janasnehi Kendra Project that has been launched by the Government of Karnataka...

The Indian Divorce Act governs divorce among the Christian couples in India. Divorce...

When an individual has more than a single PAN card, it may lead to that person being heavily penalised, or worse,...
Employees Provident Fund (PF) is social security and savings scheme for employee in India. Employers engaged...


