 Last updated: November 17th, 2022 3:35 PM
GSTR 5 Return Filing - Non-Resident Taxable Person
Non-resident taxable persons are required to file GSTR-5 return through the GST portal every month. In this article, we look at GSTR 5 return filing in detail along with the procedure for filing GSTR 5 return. Obtaining GST registration for a non-resident taxable person.Due Date for Filing GSTR 5 Return
GSTR 5 return must be filed on or before the 20th of every month by non-resident taxable persons. In case of cancellation or expiry of GST registration, the non-resident taxable person must file the final return GSTR 5 filing within 7 days of expiry of GST registration. Failure to file GSTR 5 return on or before the due date will attract a penalty. In addition to the penalty, the GST compliance rating of the non-resident taxable person will also be impacted.How to File GSTR 5 Return?
GSTR 5 return can be filed online in the GST Portal. You can prepare GSTR 5 return on LEDGERS GST Software based on the invoices issued, GST input tax credit available and directly file on the GST portal through an API.Conditions for Filing Form GSTR-5
The following are the conditions for filing Form GSTR-5 are as follows:- The taxpayer should be registered as a Non-Resident taxable person and should contain a valid GSTIN.
- The taxpayer should have a valid user ID and password.
- The taxpayer should have a valid and non-expired / non-revoked Digital Signature Certificate (DSC) in case of the taxpayer for whom digital signature is mandatory such as Companies, LLP/FLLP, in other instance authentication of return can be done through EVC.
Online Procedure to File Return in Form GSTR-5
To file for return in Form GSTR-5 through the GST portal, follow the steps explained here: Step 1: Visit Official Portal Visit the official portal of the GST department. Step 2: Provide Login Details The applicant has to log in to the GST Portal with valid credentials. Step 3: Select Services Type Click on the “Services” tab and then select return dashboard from the menu return. [caption id="attachment_66761" align="aligncenter" width="756"]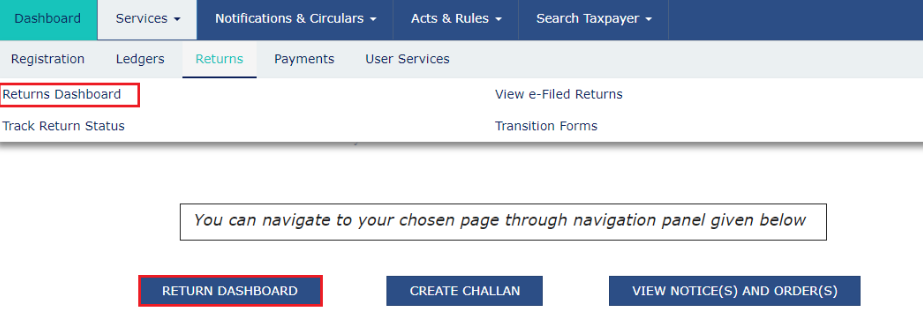 Form GSTR-5 - Image 1
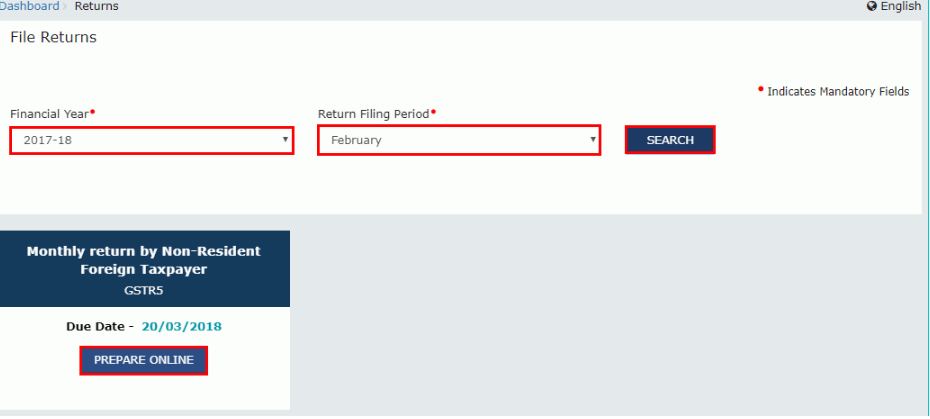
Step 4: Select the Financial Year & Return Filing Period (Month) for which you want to file the return from the drop-down list so that the file return page is displayed and click the “Search” button.
Step 5: Click the “Prepare Online” button if you want to prepare the return by making entries on the GST Portal.
[caption id="attachment_66763" align="aligncenter" width="705"]
 Form GSTR-5 - Image 2
Step 6: Click on the Generate GSTR-5 summary button at the bottom of the page to view the details of auto-drafted supplies of goods or services.
Step 7: A successful message is generated on the new page.
Enter Details in Various Blocks
Step 8: Click on the blocks which are present in the table and enter the related details like original and amendment details.
Step 9: Import of Goods
- Click on the 3-Import of Goods block to add details of inputs or capital goods received from overseas and press “Add BOE” to add a new invoice.
 Form GSTR-5 - Image 3
- Enter the details such as port no, bill of entry number, bill of entry date, bill of entry value in the boxes which is displayed on the current page.
- Click on the “Save” button to save the invoice details.
- Click on the ”Back” button to reflect the number of invoices added along with total taxable value, total liability and total ITC available.
 Form GSTR-5 - Image 4
Step 10: Outward Supplies Made
- Click the 5 - Outward Supplies Made block to add details of taxable outward supplies made to registered persons and then Click the “Add Details” button.
 Form GSTR-5 - Image 5
- Choose Is the supply eligible to be taxed at a differential percentage (%) of the existing rate of tax, as notified by the Government? Checkbox, in case of supply, is eligible to be taxed at a differential percentage of the existing rate of tax.
- Click on the “Save” outward supplies button to save the invoice details.
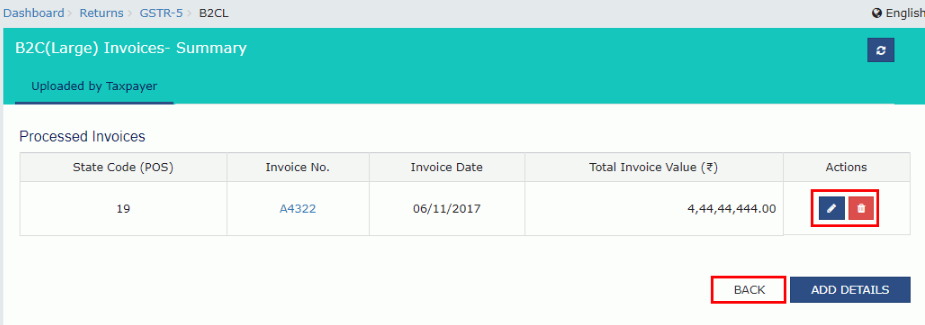
- Click on the “Add Details” button to add the details in the B2C Invoices block.
 Form GSTR-5 - Image 6
- After entering the appropriate details in the field click on the ”Save” button.
- Click on the "Back" button will reflect the number of invoices added along with total taxable value and total liability.
 Form GSTR-5 - Image 7
Step 12: 7A,7B-B2C(Small)
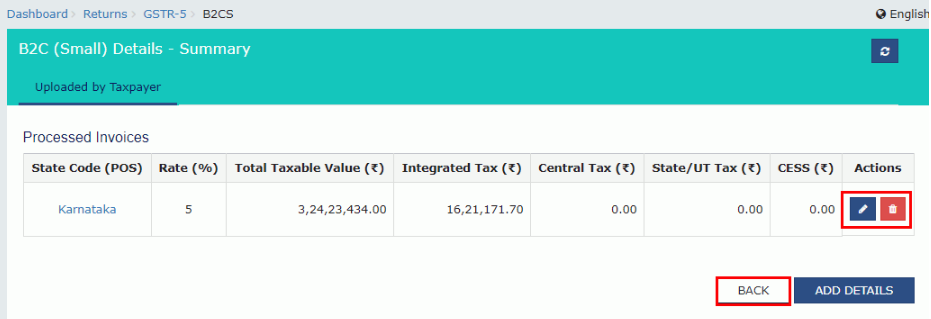
- Click on the “Add Details” button to add the details in the 7A, 7B-B2C (small) block.
 Form GSTR-5 - Image 8
- After entering the appropriate details in the field click on the ”Save” button.
- Click on the ”Back” button will reflect the number of invoices added along with total taxable value and total liability.
 Form GSTR-5 - Image 9
Step 13: 8B- Credit/Debit Notes
- Click on the “Add credit/debit note” block and add the details in the field which is necessary and click the “Save” button.
 Form GSTR-5 - Image 10
- Provide the Taxable Values against various GST rates as applicable.
- Click the Counterparty GSTIN tab under the Processed Invoices section.
- Click on the “Add Credit/Debit Notes” block and add the details of credit/debit notes in the field and click the “Save” button.
 Form GSTR-5 - Image 11
- The user will be directed to the previous page, and a message has appeared that the invoice is added.
- Click on the "Back" button will reflect the number of Credit / Debit Notes added.
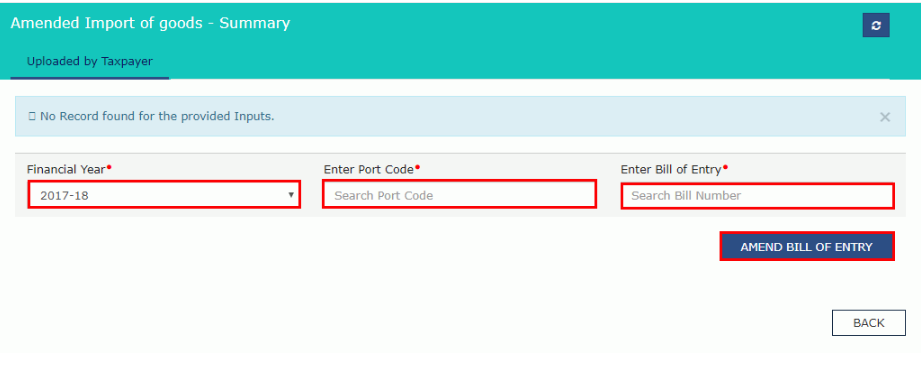
- Click on the “Amended Imports of Goods” block to add details of amendments to import of goods.
 Form GSTR-5 - Image 12
- Click the Amend bill of entry button after entering the necessary details.
- Make amendments to the details as required and click the Save button to save the invoice details.
- Click on the ”Back” button will reflect the number of invoices added along with total invoice value, total liability and total taxable value.
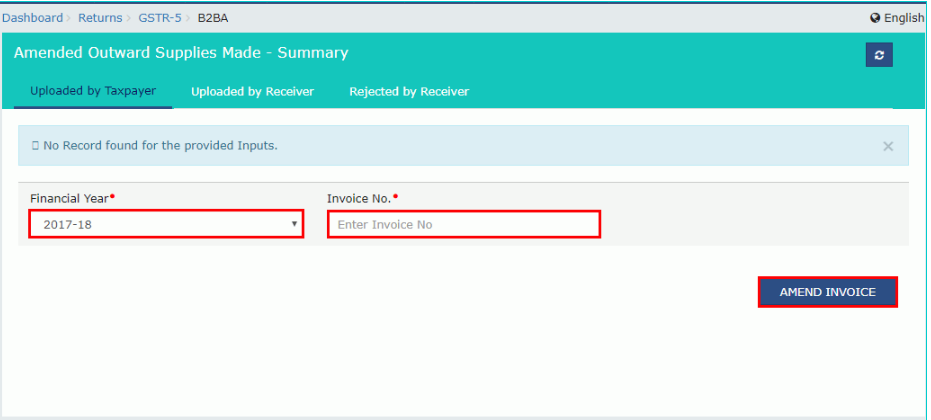
- Click the 8A - Amended Outward Supplies block to add details of amendments to outward supplies to registered persons.
- Select the Financial Year and enter the invoice number and click the Amend Invoice button.
 Form GSTR-5 - Image 13
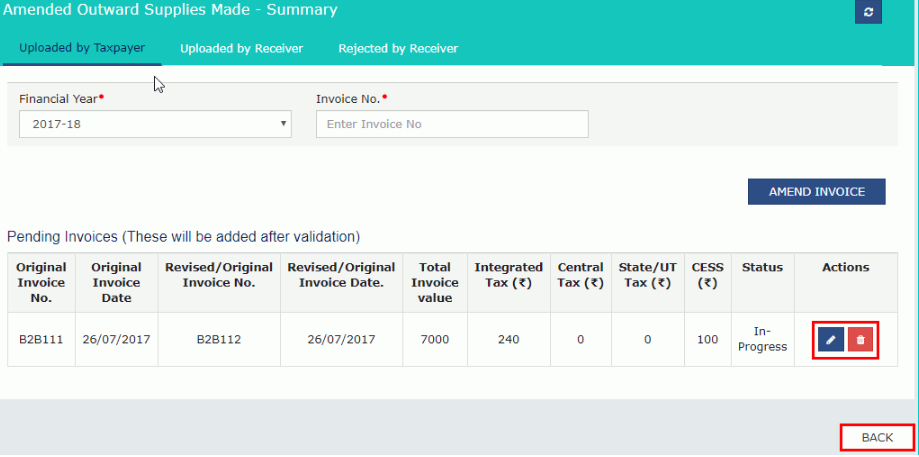
- Click on Save Outward Supplies button to save the invoice details after filling the information.
- Click on ”Back” button will reflect the number of invoices added along with total invoice value, total liability and total taxable value.
 Form GSTR-5 - Image 14
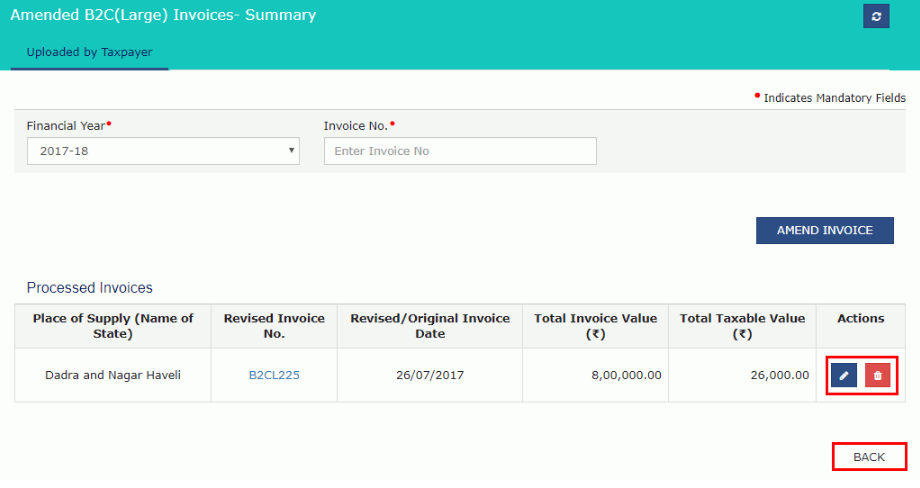
Step 17: 8A- Amended B2C (Large Invoices)
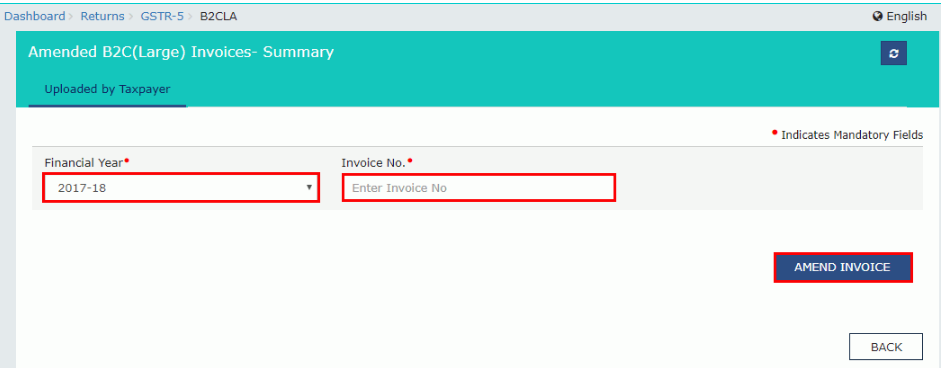
- Click on 8A - Amended B2C (Large Invoices) block to add details of amendments to outward inter-state supplies to unregistered persons.
- Select the Financial Year and enter the invoice number and click the Amend Invoice button.
 Form GSTR-5 - Image 15
- Click on “Save” button to save the invoice details.
- Click on ”Back” button will reflect the number of invoices added along with total invoice value, total liability and total taxable value.
 Form GSTR-5 - Image 16
Step 18: 9-Amended B2C (Small)
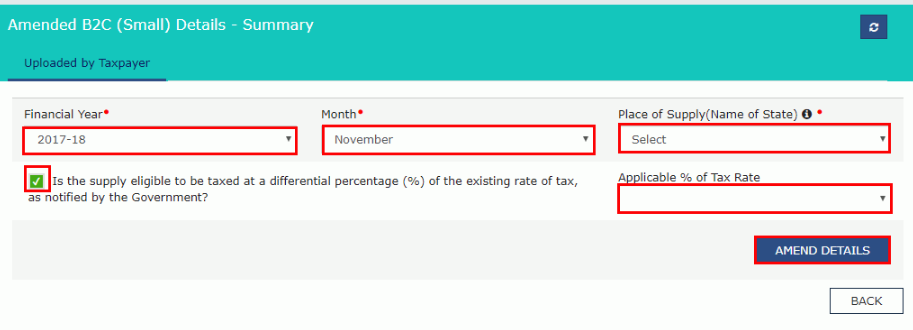
- Click the 9 - Amended B2C (Small) block to add details of amendments to outward supplies to unregistered persons.
- Fill the amended B2B(Small) details – a summary page which is displayed and click “Amend details” button.
 Form GSTR-5 - Image 17
- Click on “Save” button to save the invoice details.
- Click on ”Back” button will reflect the number of invoices added along with total invoice value, total liability and total taxable value.
- Click on 8C - Amended Credit/Debit Notes tile to add details of amendments to Credit/Debit Notes for supplies to registered persons.
- Select the Financial Year and enter credit /debit note no and click the Amend note button.
 Form GSTR-5 - Image 18
- Click on “Save” button to save the invoice details.
- Click on ”Back” button will reflect the number of invoices added along with total invoice value, total liability and total taxable value.
- Click on 8C - Amended Unregistered Amended Credit/Debit Notes blocks to add information of amendments to Credit/Debit Notes to supplies on unregistered individuals.
- Select the Financial Year and enter credit /debit note no and click the Amend note button. Click on “Save” button to save the invoice details.
 Form GSTR-5 - Image 19
- Click on ”Back” button will reflect the number of invoices added along with total invoice value, total liability, total taxable value and total ITC applicable.
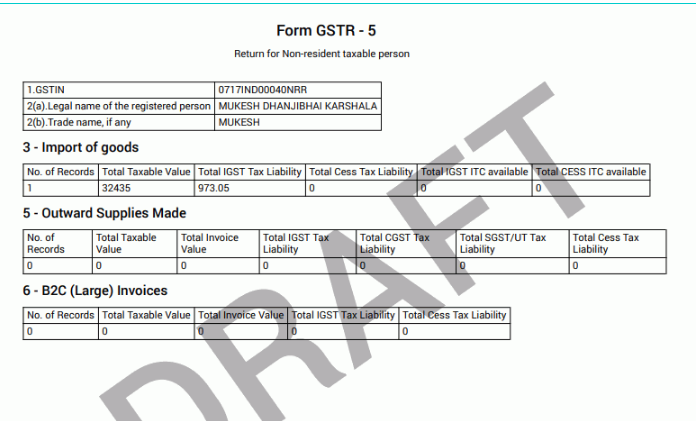
- Once you have completed with the details, press the Preview button.
- This preview button will download the draft Summary page of your GSTR-5 for your review.
 Form GSTR-5 - Image 20
Step 22: 10A,10B,- Tax Liability
- Click on 10A, 10B – Tax Liability tile to view the tax liability details.
- The Tax Liability details are displayed. Click on the Back button to go to the previous page.
 Form GSTR-5 - Image 21
Step 23: E-Acknowledgment and Submit GSTR-5 to freeze data.
- Choose the acknowledgement check-box declaring that you have viewed the details of preview and the information submitted is correct, and you are aware that no changes can be made after submission. After clicking the acknowledgement, the Submit button will be enabled.
- Click on the Proceed button to accept the Warning message.
 Form GSTR-5 - Image 22
- A confirmation message appears at the top of the page. Upon submission of the data, data will be frozen, and you cannot change any fields.
- Click on the Preview button again, to download the submitted GSTR-5 in PDF format.
- Click the payment of tax block.
 Form GSTR-5 - Image 23
- Click on Check Ledger Balance button to see the available balance for credit under Integrated Tax, Central Tax, State/UT Tax and Cess. The functionality enables the taxpayers to verify the balance before making the payment for the respective minor heads.
- The Check Ledger Balance page is displayed. Click on the Ok button to go back to the previous page.
- Kindly provide the amount of credit to be utilised and click the Offset Liability button to pay off the liabilities.
- The tax liability is offset and then click on the Ok button after the confirmation message is displayed.
- Click the 11, 12, 14 - Tax Payable and Paid block.
- After performing payment of tax, the amount of tax paid will be auto-populated in Table 11 along with the debit entry numbers produced on the utilisation of Cash balances and ITC. Press the Back button to proceed back to the previous page.
- Click on the File return button.
- The Returns Filing for GST GSTR5 page is displayed. Select the Declaration checkbox. Select the name of authorised signatory in the name of authorised signatory drop-down list.
- Click on the “File with DSC” or “File with EVC” button.
- Click the Proceed button and select the certificate and click the Sign button.
- Enter the OTP which is received to your email ID and mobile number of the Authorized Signatory and press the Verify button.
- The success message is displayed. Click the Back button.
Making GST Payment
In case the non-resident taxable person is liable to make a GST payment, a GST payment challan must be generated on the GST portal and payment can be done through bank transfer, credit card, debit card or deposit of cheque or demand draft. Since non-resident taxable persons are required to pay GST in advance at the time of GST registration, most taxpayers would not have to make GST payment every month unless the credit in the account is exhausted. Procedure for making GST payment.Popular Post

In the digital age, the convenience of accessing important documents online has become a necessity...

The Atalji Janasnehi Kendra Project that has been launched by the Government of Karnataka...

The Indian Divorce Act governs divorce among the Christian couples in India. Divorce...

When an individual has more than a single PAN card, it may lead to that person being heavily penalised, or worse,...

Employees Provident Fund (PF) is social security and savings scheme for employee in India. Employers engaged...


