 Updated on: October 14th, 2022 6:01 PM
How to Get GST Registration
GST registration is mandatory for taxable persons who carry out business in India of supplying goods or services with the aggregate value of supply is exceeding 40 lakh. In this article, we look at the eligibility, list of documents required and step by step guide on how to get GST registration in India.Normal Taxpayers
The GST registration under the normal category would not have to pay a deposit and also will not have an expiry date. Under the GST law, an average taxpayer will have to provide three monthly returns and one annual return.Documents Required
The following are the list of documents required to be submitted by the Normal Taxpayers for the GST Registration.Public/Private Limited Company
- Aadhar card of all Directors
- PAN card of all the Directors
- DSC of all Directors
- Business Address proof
- If a business place is rental, Rental agreement / Lease agreement
- NOC from the Landlord / Owner (even if the place is one of the Directors')
- Recent Electricity Bill OR Property Tax receipt
- Passport size Photo of all Directors
- Company PAN number
- Incorporation Certificate
- Memorandum of Association (MoA)
Trust, Society, Association & Club (TASC)
- Constitution document of the entity
- The updated directors list to be submitted.
- Identity Proof: PAN Card of the entity
- Address Proof: Aadhar Card of the sole proprietor/ entity, Valid Passport, etc.
Limited Liability Partnership (LLP)
- Aadhar card of all Directors
- PAN card of all the Directors
- DSC of all Directors
- Business Address proof
- a. If a business place is rental, Rental agreement / Lease agreement b. NOC from the Landlord / Owner (even if the place is one of the Directors')
- Recent Electricity Bill OR Property Tax receipt
- Passport size Photo of all Partners
- Company PAN number
- Incorporation Certificate
- Memorandum of Association (MoA)
- Partnership Deed
Hindu Undivided Family (HUF)
- Id Proof and Address Proof of the Karta
- Deed of declaration of HUF
- Photos of Karta.
Foreign Company/ Foreign Limited Liability Partnership
- Certificate for Establishment
Business Registration Document
- Copy of Resolution passed by the Board of Directors/ Managing Committee and Acceptance letter
- Letter of Authorization
Bank Account Proof
- Bank Statement
- Cancelled Cheque
- The first page of Pass Book
Proof for Place of Business
- Electricity Bill
- Municipal Khata Copy
- Property Tax Receipt
- Legal ownership document
GST Registration Procedure - Normal Taxpayer
Normal Taxpayers must follow the below steps to apply for GST Registration.Visit GST Portal
Step 1: Firstly, the taxpayers have to visit the Goods and Services Tax portal for the GST Registration. [caption id="attachment_64015" align="aligncenter" width="695"]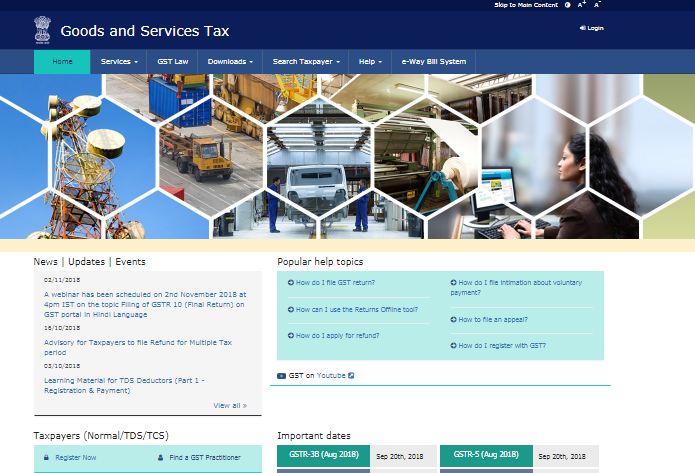 Step 1-GST-Registration-Procedure-for-Normal-Taxpayers
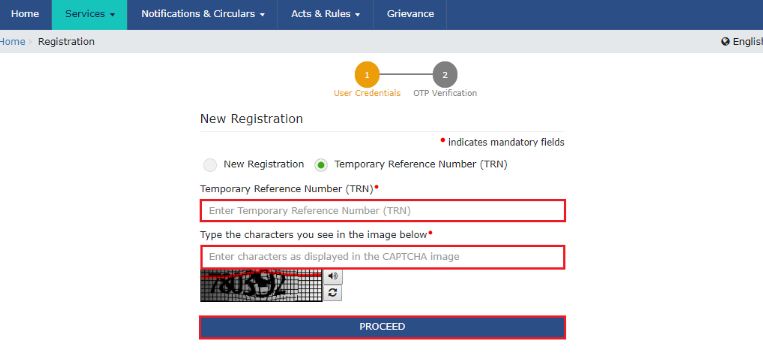
Step 2: A taxpayer has to click on the New Registration under the services tab that is visible on the home page. The following application procedure is of two parts:
- New Registration
- Temporary Reference Number (TRN)
 Step 2-GST-Registration-Procedure-for-Normal-Taxpayers
New Registration
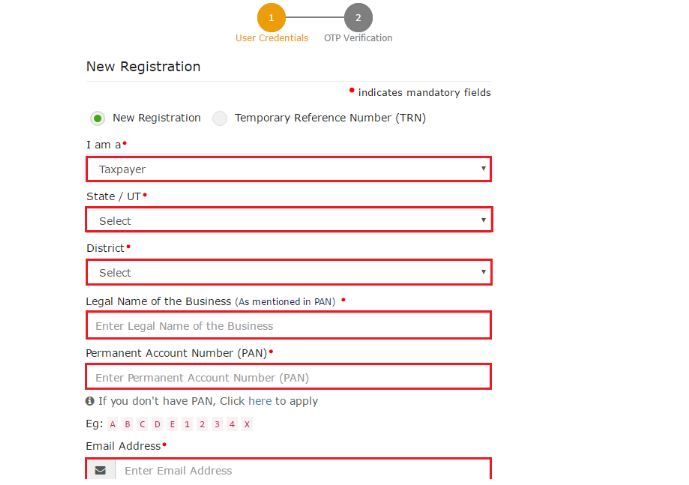
Step 3: By clicking on the New Registration radio button, the new registration page is displayed.
- Then the taxpayer has to select the taxpayer type from the dropdown list.
- Select the state and district for which the registration is required.
- Enter the legal business/entity name as mentioned in the PAN database.
- Enter the PAN of the Proprietor or PAN of the business.
- Enter the email address and valid mobile number of the Primary Authorized Signatory.
- An OTP will be sent for the verification of mobile number and email address.
- Enter the OTP and captcha given. Then click on the Proceed button.
- Enter the Temporary Reference Number (TRN) that is received and enter the captcha text as shown.
- Next, click on the Proceed button.
- The OTP verification page will be displayed.
- Enter the OTP and captcha given. Then click on the Proceed button.
 Step 4-GST-Registration-Procedure-for-Normal-Taxpayers
Registration Application Page
Step 5: Upon clicking on the 'proceed' button, the "My Saved Application page" will be displayed. [caption id="attachment_64021" align="aligncenter" width="943"] Step 5-GST-Registration-Procedure-for-Normal-Taxpayers
Step 6: Click the Edit icon under the Action column.
Step 7: The Registration Application form will be displayed with the following tabs:
- Business Details
- Promoter/ Partners
- Authorised Signatory
- Authorised Representative
- Authorised Representative
- Principal Place of Business
- Additional Places of Business
- Goods and Services
- Bank Accounts
- State Specific Information and Verification
 Step 7-GST-Registration-Procedure-for-Normal-Taxpayers
Provide Business Details
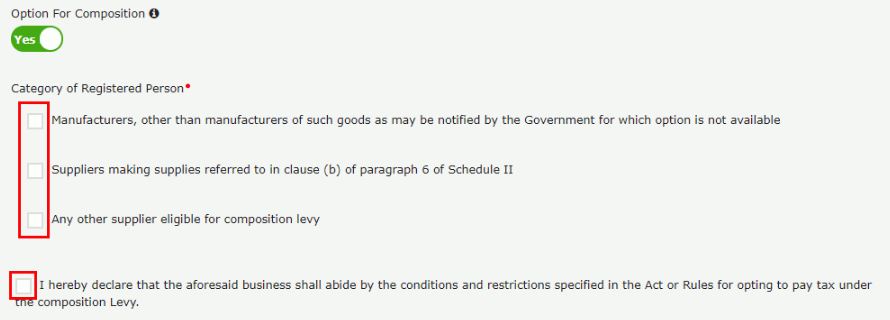
Step 8: On clicking on the business details tab, it displays the information to be filled for the business registration. Step 9: Now enter the following details:- Trade name of the business
- Constitution of the business
- District and sector/circle/ward/charge/unit number of the business
 Step 9-GST-Registration-Procedure-for-Normal-Taxpayers
- Code Number
Provide Promoter/ Partners Details
Step 12: Enter the details of up to 10 Promoters or Partners. Now enter the following details:- Personal details of the stakeholder.
- Official information of the stakeholder (Identity Information).
- Designation of the stakeholder.
- DIN of the stakeholder issued by Ministry of Corporate Affairs.
- Address details of the stakeholder.
- Upload the photo of the stakeholder.
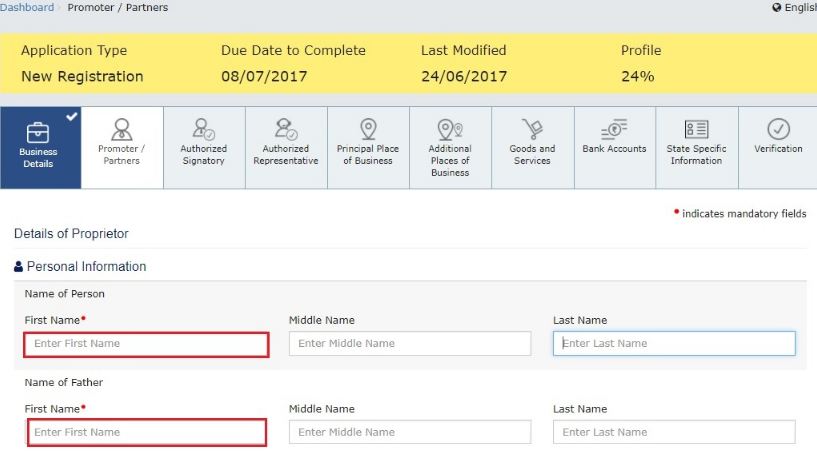 Step 12-GST-Registration-Procedure-for-Normal-Taxpayers
Step 13: After filling all the details, click on the Save & Continue button.
Provide Authorized Signatory Details
Step 14: Enter up to 10 authorised signatories details. Step 15: Select the checkbox for Primary Authorized Signatory, in case of Primary Authorized Signatory.- Enter the personal details of the authorised signatory.
- Enter the official information of the stakeholder, in the Identity Information section.
- Enter the designation of the authorised signatory, in the Designation / Status field.
- Enter the DIN of the authorised signatory issued by Ministry of Corporate Affairs, in the Director Identification Number (DIN) field.
- Enter the PAN and Aadhaar Number of the authorised signatory in the respective field.
- Upload the photo of the authorised signatory.
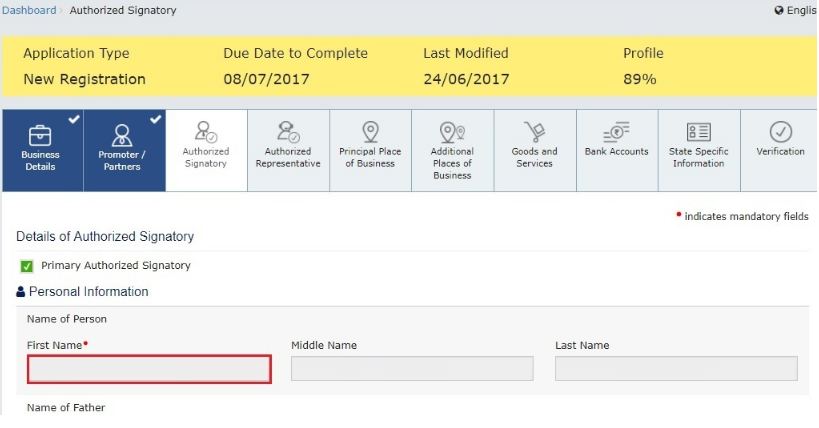 Step 15-GST-Registration-Procedure-for-Normal-Taxpayers
Step 16: After filling all the details, click on the Save & Continue button.
Provide Authorized Representative Details
Step 17: Select "Do you have any Authorized Representative" radio button. Step 18: In the case of GST Practitioner, enter the enrollment ID of the authorised representative and click on the "Search" button. [caption id="attachment_64026" align="aligncenter" width="706"]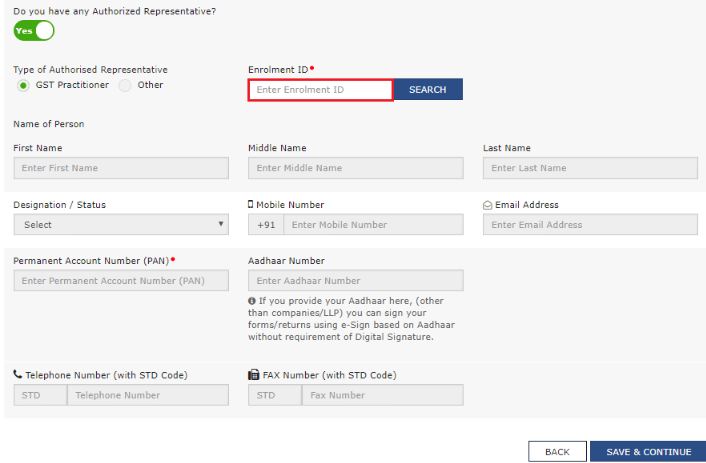 Step 18-GST-Registration-Procedure-for-Normal-Taxpayers
Step 19: In case of Other, enter the details such as name, designation, mobile number and email address of the authorised representative and click on the "Search" button.
Provide Principal Place of Business Details
Principal Place of Business is the location of the taxpayer's business within the State where it is performed. Step 20: Enter the following details of the principal place of business.- Address details of the principal place of business
- Official contact details
- Nature of possession of premises.
- Upload the proof of Principal Place of Business document
- Upload the evidence of SEZ Unit
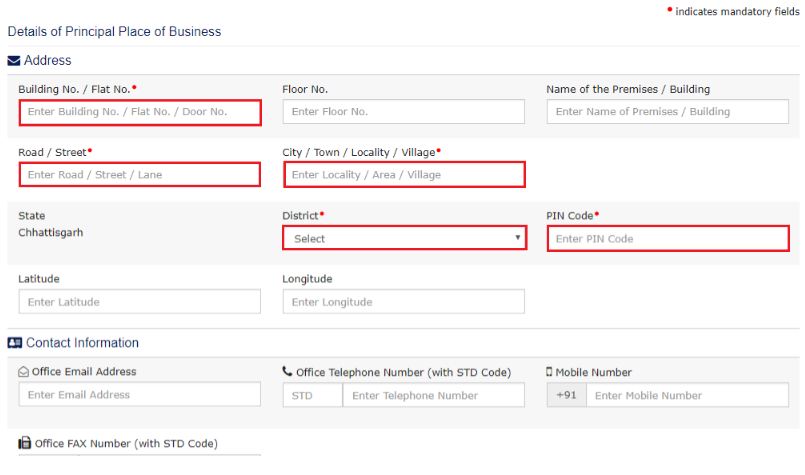 Step 20-GST-Registration-Procedure-for-Normal-Taxpayers
Step 21: After filling all the details, click on the Save & Continue button.
Submit Goods and Services Details
Step 22: Mention the HSN Code in the Goods tab, in case of dealing with the Goods or Commodities. [caption id="attachment_64028" align="aligncenter" width="801"]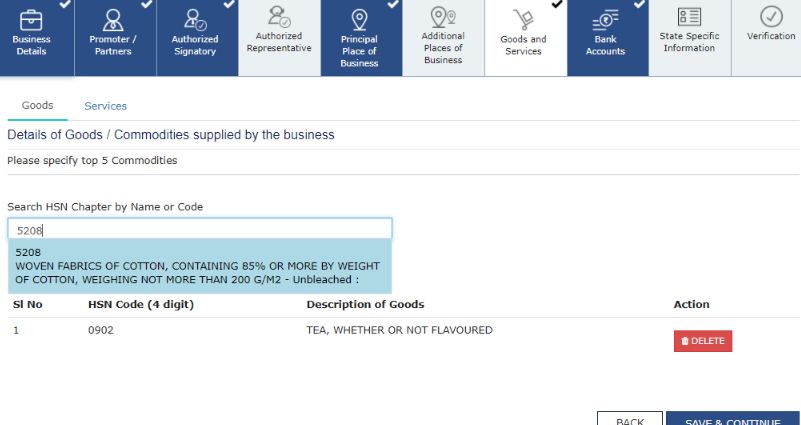 Step 22-GST-Registration-Procedure-for-Normal-Taxpayers
Goods Tab: To add the HSN Code, enter the first four digits 6105 from the HSN Code in the Search HSN Chapter by Name or Code field.
Services Tab: To fill the Service Classification Code, select the building type and Service Classification Code.
Step 23: After filling all the details, click on the Save & Continue button.
Bank Accounts Details
Step 24: In this tab, the details of the bank accounts are maintained for conducting business. Enter the details of up to 10 Bank Accounts. Enter the number of bank accounts and click the ADD NEW button. [caption id="attachment_64240" align="aligncenter" width="786"]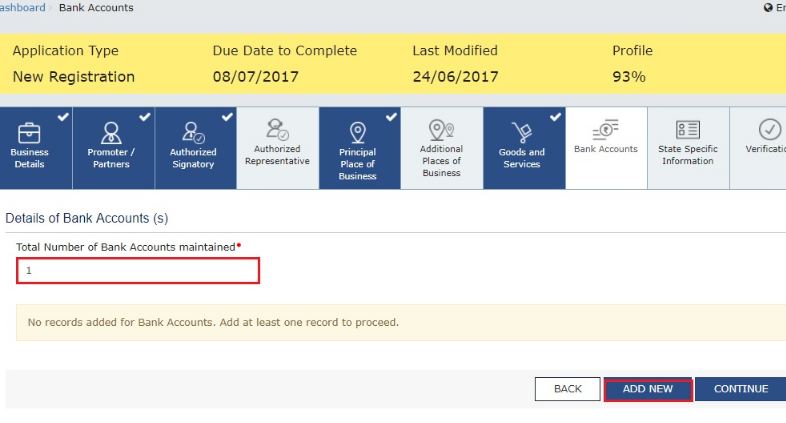 Step 24-GST-Registration-Procedure-for-Normal-Taxpayers
Step 25: Provide the following details:
- Account number of the Bank.
- Type of account.
- IFSC code of the Bank
- Upload scanned copy of Bank passbook
Verification Process
Step 27: This tab which gives the Verification Details for the authentication of the details submitted in the form. [caption id="attachment_64239" align="aligncenter" width="821"]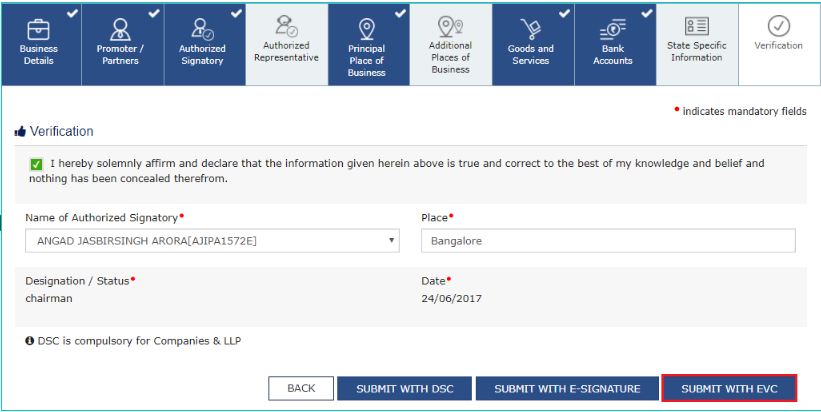 Step 27-GST-Registration-Procedure-for-Normal-Taxpayers
Step 28: Provide the following details:
- Name of the authorised signatory.
- Place where the form is filed
- Digitally sign the application form
Popular Post

In the digital age, the convenience of accessing important documents online has become a necessity...

The Atalji Janasnehi Kendra Project that has been launched by the Government of Karnataka...

The Indian Divorce Act governs divorce among the Christian couples in India. Divorce...

When an individual has more than a single PAN card, it may lead to that person being heavily penalised, or worse,...

Employees Provident Fund (PF) is social security and savings scheme for employee in India. Employers engaged...


